
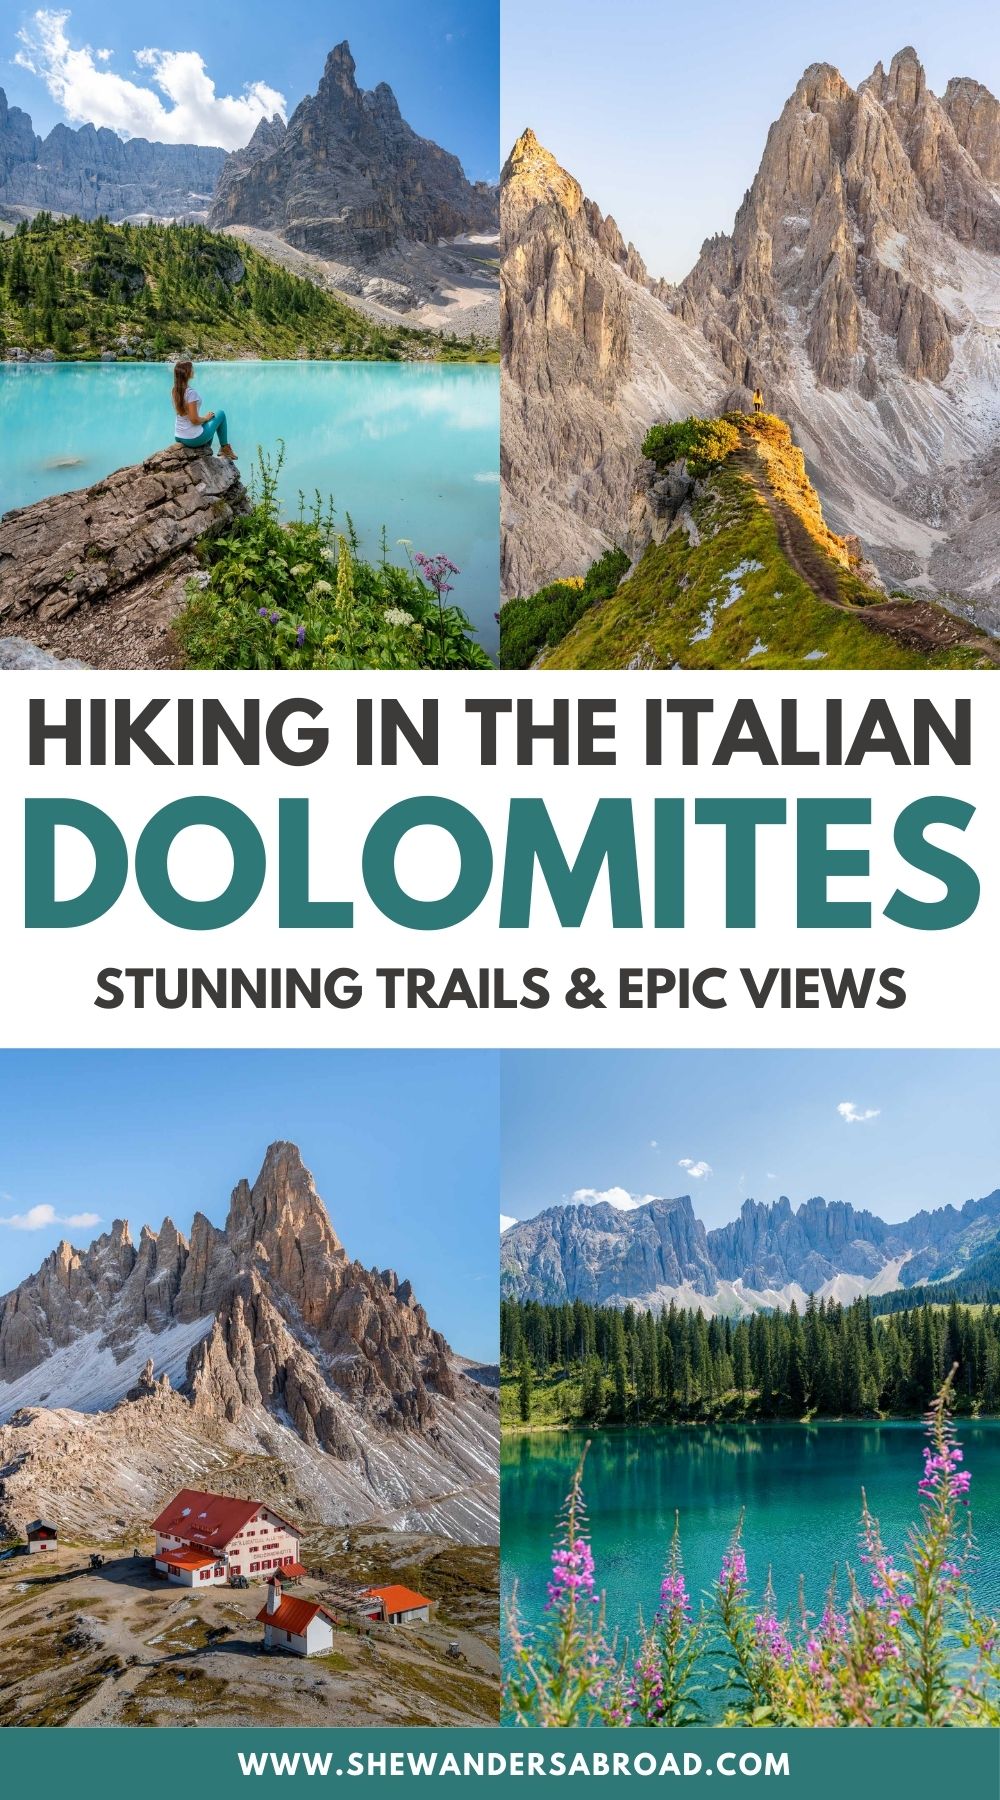
12 Best Hikes in the Dolomites with Epic Views
If hiking is on your Dolomites itinerary, you’re in the right place! This region is packed with incredible trails, and many of the best views are surprisingly accessible without having to commit to long or technical hikes.
After hiking in the Dolomites multiple times, I’ve put together this list of the best hikes in the Dolomites that are actually worth your time. You’ll find a mix of easy walks, classic day hikes, and a few more challenging routes, all chosen for their scenery and overall experience.
Whether you’re new to hiking or already comfortable on mountain trails, there’s something here you can realistically add to your Dolomites road trip itinerary.
Disclosure: This post contains a few affiliate links, which means I may receive a small commission, at no cost to you, if you make a purchase through my link.
Quick Travel Planning Tips for the Dolomites
🏨 Where to Stay: Ortisei and Cortina d’Ampezzo are two of the best bases in the Dolomites. Hotel Angelo Engel is a great option in Ortisei, while Hotel Aquila is centrally located in Cortina.
⛰️ Best Time to Visit: June to September is best for hiking and mountain scenery, while December to March is ideal for skiing in the Dolomites.
✈️ Where to Fly To: The closest major airports are Venice and Milan. Venice is the easiest option for Cortina and the eastern Dolomites, while Milan works better if you’re heading toward Val Gardena.
🚗 Getting Around: Renting a car is the easiest way to explore the Dolomites and reach trailheads and mountain passes. Use Discover Cars to compare rental options, especially if you’re visiting multiple areas.
🚌 Best Day Trips: If you don’t want to drive, join an organized Dolomites day trip from Venice that includes Cortina and Lake Braies, or a full day Dolomites tour starting from Lake Garda.
📱 Stay Connected: Use an eSIM from Airalo to stay online in the Dolomites for maps, navigation, and bookings without swapping SIM cards.
No time to read now?
Pin it for later!
Map of the Best Hikes in the Dolomites
On the below map, you can find all the exact trails mentioned in this article together with parking lots, guesthouses, and some scenic viewpoints.
How to use this map: This map is fully interactive, so you can move around, zoom in/zoom out, and click on the icons. If you want to see a larger map, click on the bracket in the upper right corner. To see more details and the different layers, click on the tab in the upper left corner. If you want to save it for later, click on the star icon next to the name of the map. Then simply open Google Maps either on your desktop or phone, go to ‘Saved’/’Maps’, and open the map whenever you need it.
Best Hikes in the Dolomites
1. Tre Cime di Lavaredo Loop

Starting point: Rifugio Auronzo
Ending point: Rifugio Auronzo
Distance: 10.6 km
Elevation gain: 430 meters
Duration: 4-5 hours
Difficulty: Easy
The Tre Cime di Lavaredo loop is the most famous hike in the Dolomites, and for a very good reason! It gets you up close with the iconic three peaks that you’ll have seen plastered all over Instagram and travel guides for the Dolomites.
Although relatively long, this is an easy hike that is accessible to almost everyone. It’s one of the best day hikes in the Dolomites for beginner hikers and even children, but remember that there are some uphill sections.
You can complete this hike either clockwise or counterclockwise. I definitely recommend going counterclockwise because this means you’ll have a view of the three peaks the whole time.
In that case, when you leave the rifugio, you will need to follow path no. 101, which takes you towards Rifugio Lavaredo and eventually, the Forcella Lavaredo viewpoint.
This is the highest point on the hike and rewards you with one of the most incredible panoramas in the entire Dolomites! Towards the end of the hike, you will also see the razorblade spires of Cadini di Misurina.


There are a number of rifugios on this trail where you can grab some refreshments. My personal recommendation is the Dreizinnenhütte, which has the most unforgettable views.
If you want to extend your Tre Cime hike, you can start at Lago d’Antorno and walk to Rifugio Auronzo from there. This takes about 1.5 hours each way, but it’s very steep and quite demanding!
Otherwise, you can reach Rifugio Auronzo by bus from Lago d’Antorno or drive up in your own car. There is only one road leading up to Rifugio Auronzo, and since it’s a private toll road, you now have to reserve a parking spot in advance to drive up.

Related Post
Tre Cime di Lavaredo Hike: The Ultimate Guide
If you want to know more about this hike, check out my comprehensive guide below!
2. Cadini di Misurina

Starting point: Rifugio Auronzo
Ending point: Rifugio Auronzo
Distance: 2 km
Elevation gain: 112 meters
Duration: 35-45 minutes
Difficulty: Easy
You might not know the name of this hike, but you will certainly know the viewpoint if you’ve spent any time scrolling through Dolomites photos on Instagram!
The Cadini di Misurina hike is a short walk that brings you to a spectacular viewpoint. Although not too demanding, this trail is subject to narrow paths with steep drop-offs, so it’s not one of the best hikes in the Dolomites if you have a fear of heights.
From the Rifugio Auronzo parking area, you will follow trail no. 117 in the opposite direction away from the Tre Cime track and towards the majestic peaks of Cadini di Misurina. You can see them ahead of you in the distance.


Once you’ve located the track, red and white markers will guide you all the way to the viewpoint, which pokes out from the cliffs with a view of Cadini di Misurina right in front of you.
Actually getting to the viewpoint is a little scary. The track is extremely narrow and high up with steep drops on either side. If you’re nervous about heights, then this might not be the best hike in the Dolomites for you!
Even if you’re not fazed by heights, I wouldn’t recommend walking to the viewpoint in rainy or windy conditions. As the starting point is the same as that for the Tre Cime hike, you might want to tackle both on the same day.

Related Post
Cadini di Misurina Hike: The Ultimate Guide
If you want to know exactly how to get to the viewpoint pictured above (it can be a bit tricky), read my step-by-step guide.
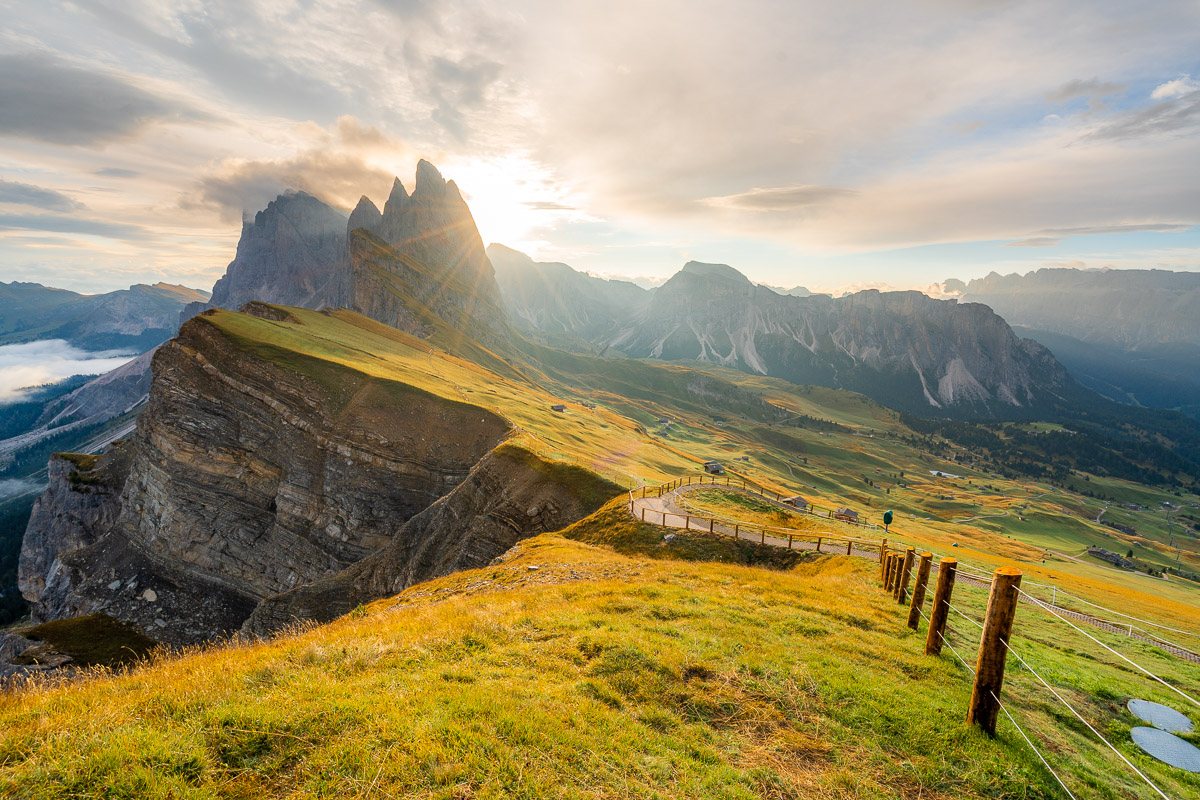
3. Seceda Ridgeline via Baita Troier Hutte

Starting point: Ortisei-Furnes-Seceda cable car
Ending point: Ortisei-Furnes-Seceda cable car
Distance: approx. 3-3.5 km
Elevation gain: 170 meters
Duration: 1-1.5 hours
Difficulty: Easy
Located inside the Puez Odle Nature Park, Seceda is one of the most iconic viewpoints in the Dolomites, and this route is a great option if you want to keep things easy while still seeing the best of it.
Start by taking the cable car up from Ortisei to Seceda. From the top station, follow the well-marked path uphill toward the ridgeline. The trail isn’t steep and is manageable for most fitness levels.
Once you reach the ridge, you can walk along it at your own pace, stopping for photos and enjoying the views over the Odle Geisler peaks.

Instead of heading straight back to the cable car, continue hiking downhill toward Baita Troier Hütte. This section is gentle and scenic, with wide open meadows and mountain views the entire way. Baita Troier is a great place to stop for a break, especially if you feel like having something sweet.
After your stop, hike back up the same way toward the Seceda cable car station. This part is a bit steeper, but still totally manageable and well worth the effort!
This is a great choice if you want to experience Seceda beyond just the main viewpoint, without committing to a long or demanding hike.
4. Seceda Ridgeline from Col Raiser
Starting point: Col Raiser Cable Car
Ending point: Ortisei-Furnes-Seceda cable car
Distance: 4-4.5 km
Elevation gain: 484 meters
Duration: 1.5-2 hours
Difficulty: Moderate
This is one of the most special ways to experience Seceda and easily one of my favorite hikes in the Dolomites!
The hike starts at the Col Raiser cable car station. From here, follow the trail toward Fermeda Hütte. This first section is mostly gentle and very scenic, with wide views opening up toward the Odle Geisler peaks as you walk.
One of the biggest advantages of this route is that you can stay overnight at Fermeda Hütte. If you do, you can hike up to the Seceda ridgeline early in the morning for sunrise, which is something you can’t do if you rely on the cable car from Ortisei.
We did this, and it was honestly one of the highlights of our entire Dolomites trip! It was a struggle to wake up at the crack of dawn and then hike up in the dark (make sure you have headlights) but it was so worth it.
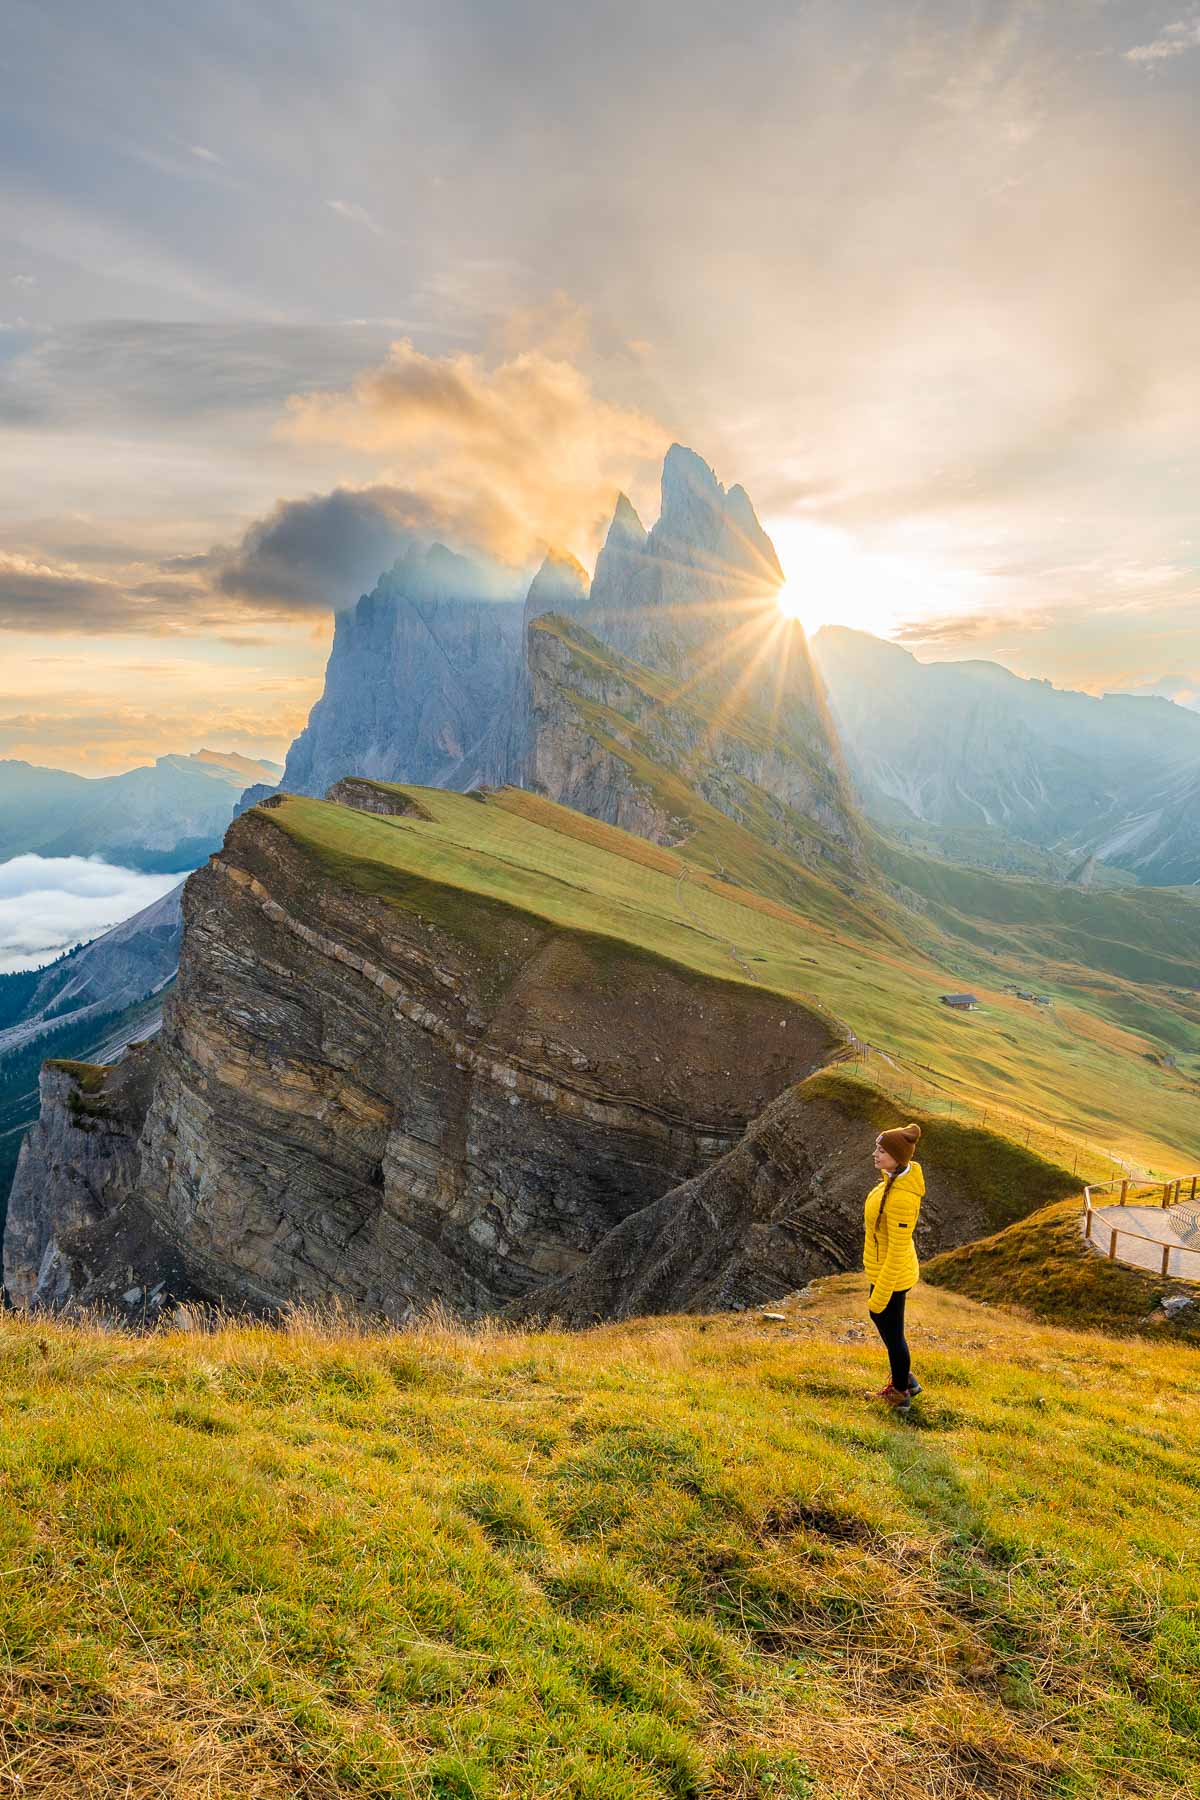

From Fermeda Hütte, the trail becomes steeper as you climb toward the Seceda ridgeline. Once you reach the top, you’ll join the classic Seceda viewpoints, with sweeping views in every direction.
Seeing this area at sunrise, before the crowds arrive, feels completely different compared to visiting later in the day!
After reaching the ridgeline, you have a couple of options. You can take the Seceda cable car down to Ortisei, or, if you prefer to keep hiking, follow the trails back down toward Col Raiser to complete a longer loop.
Also, Baita Troier Hütte does an amazing breakfast spread, which tastes heavenly after a sunrise hike, but it’s also a great stop during the day if you’re doing this route without the overnight stay.
If you’re looking for a more immersive Seceda experience and don’t mind a bit more effort, this is easily one of the most rewarding hikes you can do in the Dolomites.
Read more about the Dolomites


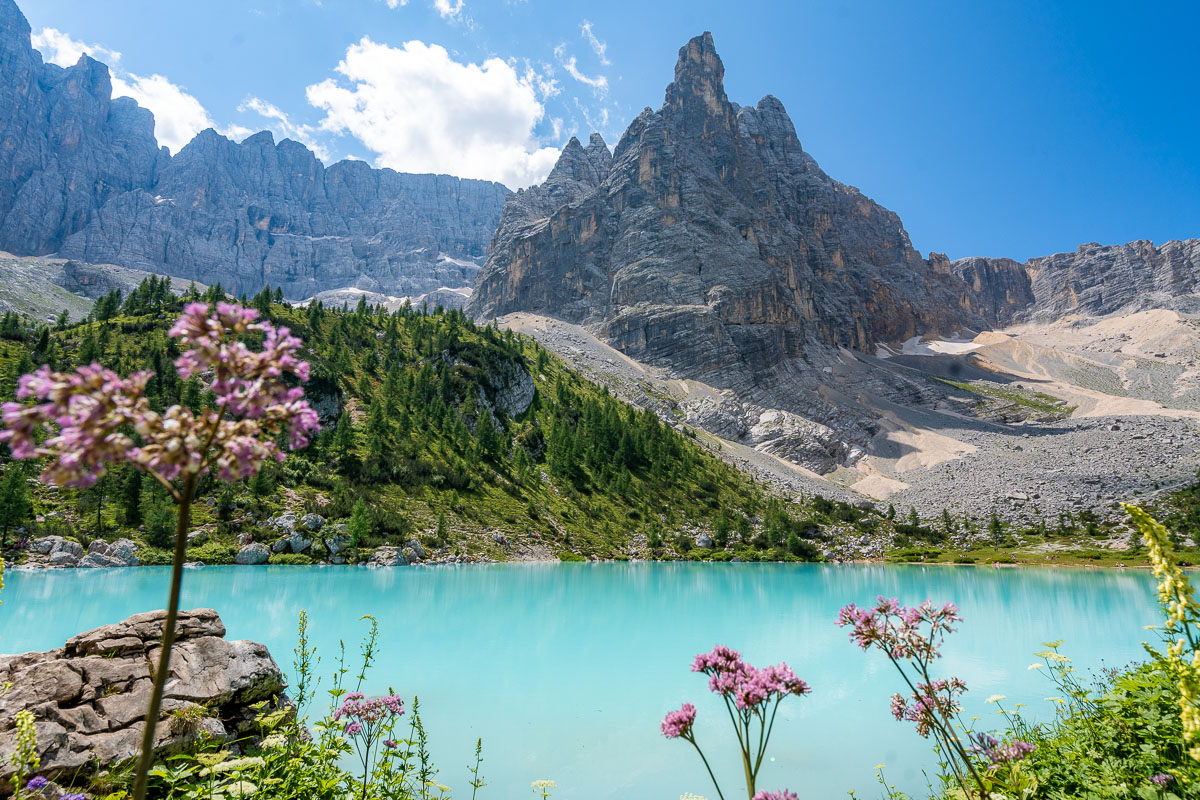
5. Lago di Sorapis
Starting point: Passo Tre Croci
Ending point: Passo Tre Croci
Distance: 12.5 km
Elevation gain: 434 meters
Duration: 4-5 hours
Difficulty: Moderate
Lago di Sorapis is one of the most beautiful lakes in the Dolomites, but if you want to see its turquoise waters with your own eyes, you’re going to need to strap on your hiking boots!
The hike takes around 2 hours each way. It’s well-marked and not too demanding, but you’ll need to traverse some narrow footpaths that hug the cliff face in some parts.
There is a railing to hang onto, but if you suffer from vertigo, this might not be the right hike for you. But it’s certainly one of the best lakes to visit in the Dolomites if you fancy getting adventurous!
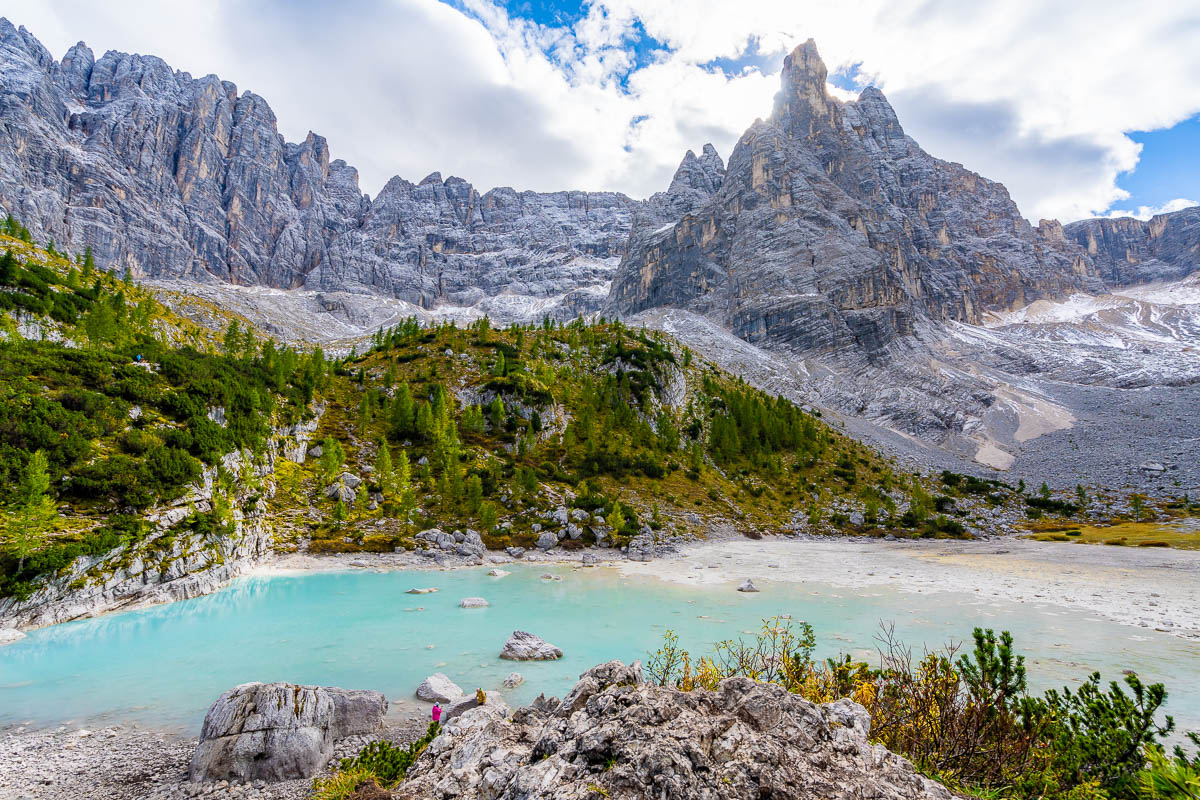

Once you reach the lake itself, you can stroll around its circumference in around 30 minutes. The color of this lake is particularly vivid and is caused by glacial dust. On a clear day, the hues really pop, and it’s a joy to photograph.
You can picnic by the lake or dine at Rifugio Vandelli, before heading back along the same route.
One important thing to keep in mind is timing. Lago di Sorapis tends to dry out toward the end of summer, so the best time to visit is usually between June and August.
I once hiked here in mid-September, and there was barely any water left in the lake! The photos I’m including here were taken in July, and the difference was honestly shocking.
6. Lago di Federa

Starting point: Ponte de Ru Curto (road 638)
Ending point: Ponte de Ru Curto
Distance: 12.5 km
Elevation gain: 759 meters
Duration: 6 hours
Difficulty: Moderate
This is one of the best day hikes in the Dolomites if you want to get off-grid and treat yourself to a view of one of the most magical lakes in the region! Lago di Federa is only accessible on foot, and it’s a pretty demanding hike with lots of legwork required.
You can walk to the lake from Ponte de Ru Curto in 2-3 hours and then return the same way. But if you have more time, I recommend that you extend the hike from the lake and complete the full loop.
Your walk starts with a lovely wander through the woods before gradually getting steeper. At some point, you will be presented with a fork, and you can either hike clockwise or counterclockwise, but I recommend the clockwise route. Either way, the trail is clearly marked the whole way.


The ascent to the lake does get rather tiring as there is a lot of uphill walking along a zig-zag path. If it has rained or during heavy snowfall, you’ll appreciate poles and/or crampons for this hike.
Once at the top, your prize is the view from the Val Negra viewpoint, which provides a swooping view across the peaks. And of course, the splendid lake with its view of the Croda da Lago mountain range.
If you want to complete the loop, you will follow the path no. 434, 436, and 435 respectively. They’re all clearly marked and deposit you at Forcella de Formin, the highest point of the hike where you will get unrivaled views across the ranges before making your way back towards Ponte de Ru Curto.
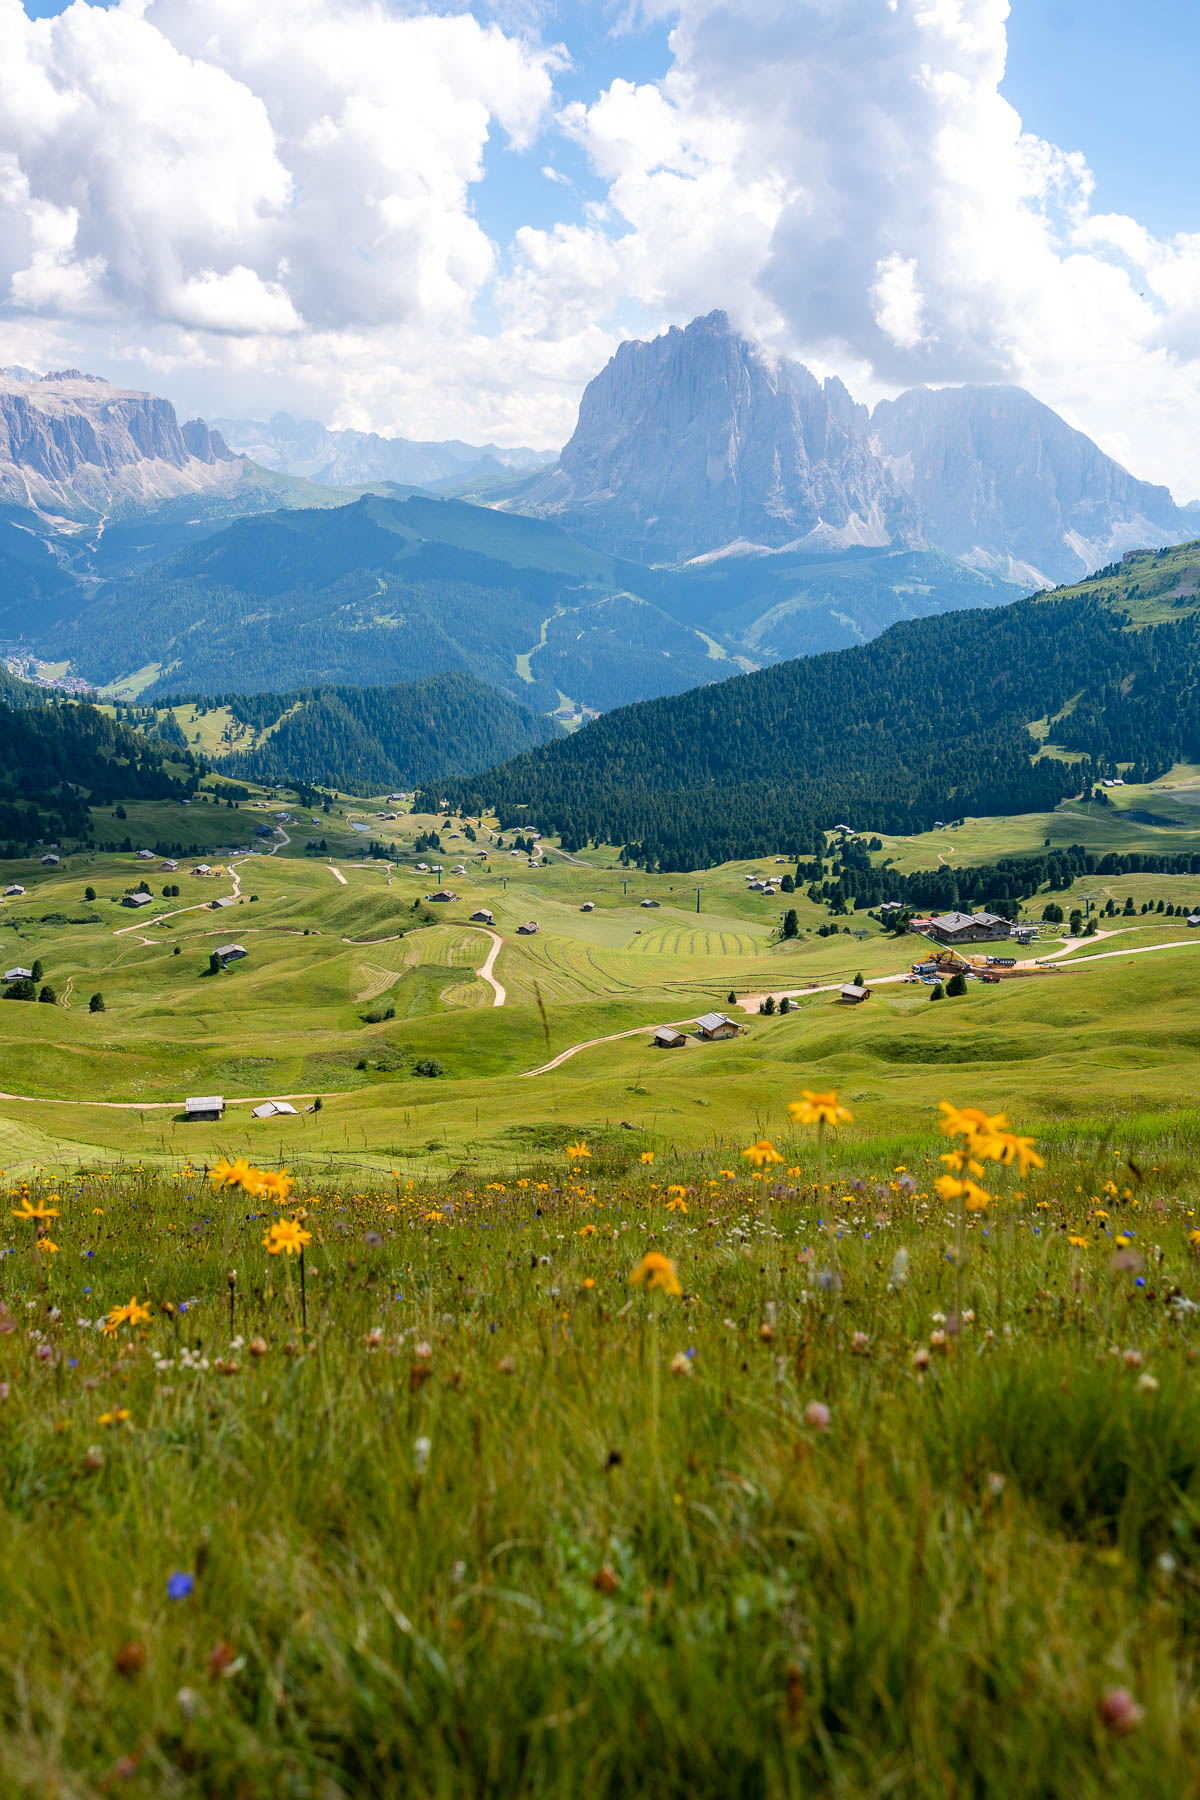
7. Alpe di Siusi/Seiser Alm

Starting point: Compatsch parking lot
Ending point: Compatsch parking lot
Distance: 9.1 km
Elevation gain: 170 meters
Duration: 2-3 hours
Difficulty: Easy
Alpe di Siusi is the largest high altitude alpine meadow in Europe and one of the most impressive landscapes in the Dolomites.
From the plateau, you get wide open views across the western Dolomites, including the Odle and Puez groups, Langkofel, Plattkofel, Marmolada, the Vajolet Towers, and the Rosengarten group. Even a short walk here delivers incredible scenery.
If you’re looking for the easiest way to visit Alpe di Siusi, you can take the cable car up from Ortisei. Once at the top, you can simply walk around the meadow and do one of the many short, mostly flat hikes in the area. This is the best option if you’re visiting during the day or don’t want to deal with driving restrictions.
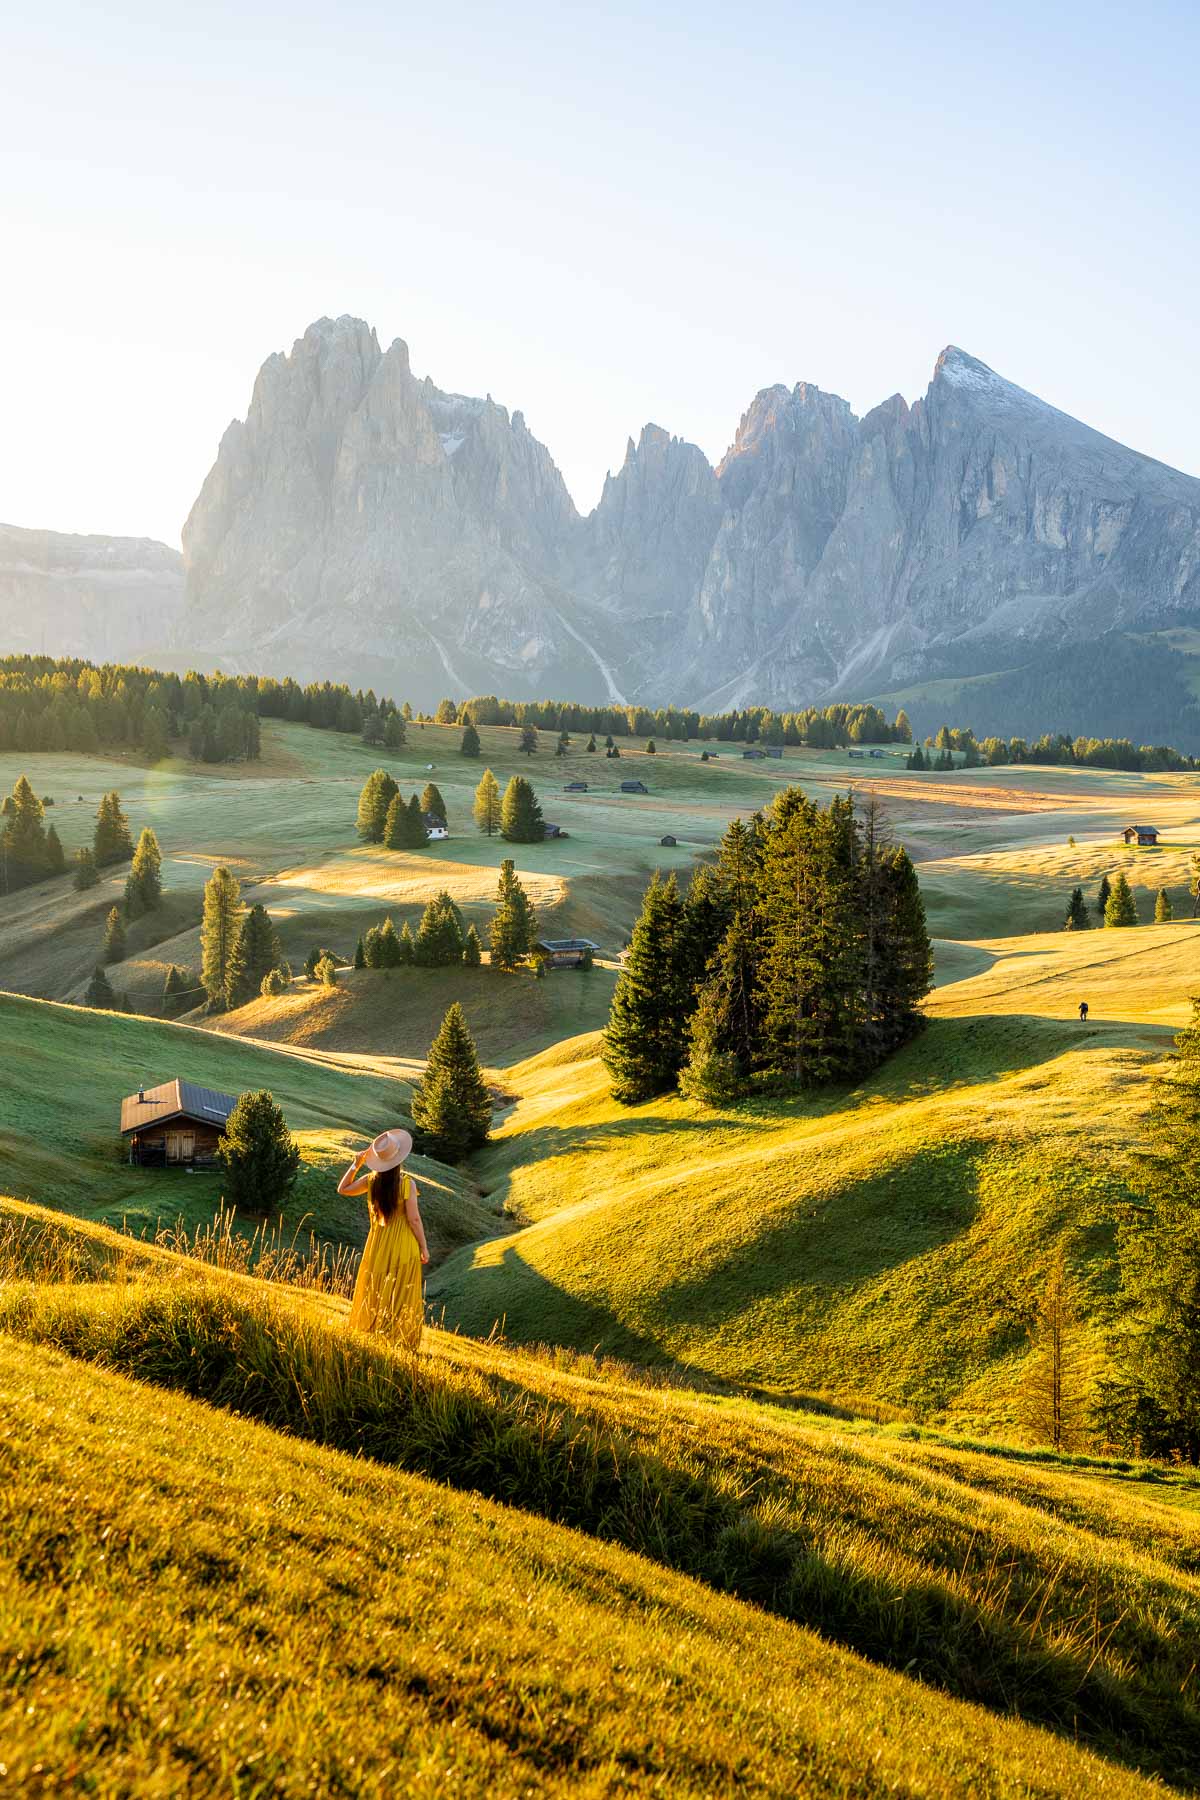

If you want to visit Alpe di Siusi for sunrise or sunset, the approach is a bit different. Driving is restricted throughout the entire Alpe di Siusi area between 9 am and 5 pm unless you have a hotel reservation on the plateau.
During these hours, access is only possible by cable car, which means sunrise and sunset aren’t doable that way.
For first light or golden hour, drive up early or later in the evening to the Compatsch parking area, outside of restricted hours. From here, it’s about a one-hour hike on a well-marked, mostly flat trail to reach the viewpoint.
Just before reaching the viewpoint, you can make a short detour to the famous swing near Malga Sanon, which is a fun stop and a popular photo spot.
Sunrise and sunset are especially beautiful here, but keep in mind that July and August can still be busy, particularly in the evening.
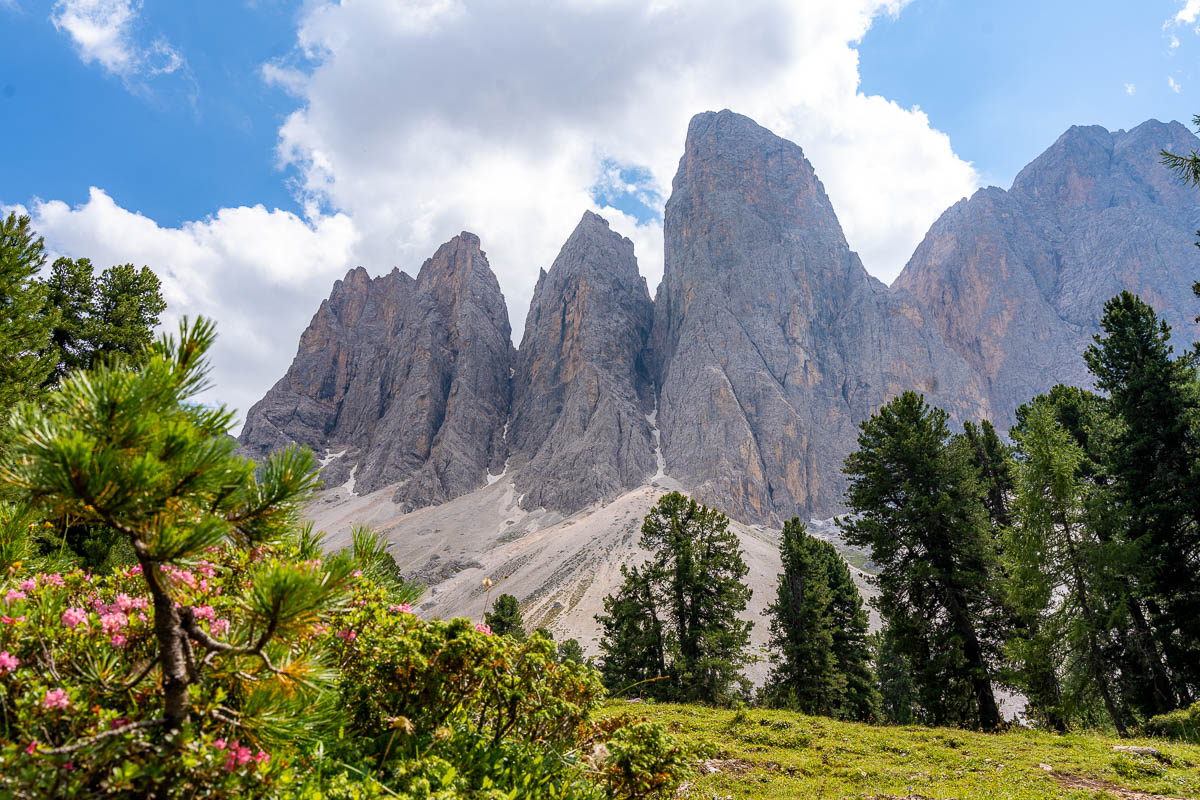
8. Adolf Munkel Weg (Odle-Geisler)
Starting point: Zanser Arm, Zans/Zannes
Ending point: Zanser Arm
Distance: 9 km (5.6 miles)
Elevation gain: 443 meters (1,453 feet)
Duration: 3-4 hours
Difficulty: Easy/Moderate
The Adolf Munkel Weg is one of the most scenic and accessible hikes in the Dolomites, running right along the base of the Odle Geisler peaks. It’s a great option if you want big mountain views without a demanding climb.
You can hike the loop in either direction, but I recommend going counterclockwise so the Odle Geisler peaks stay in front of you for most of the walk. It makes a big difference when it comes to views!
The hike starts from the Zanser Arm parking area. From the parking lot, follow trail no. 36, which leads you through a forested section toward Dusler Alm.
The path is well marked, but keep an eye out for the junction where you’ll need to turn left and head up a short set of steps.


Once you leave the forest behind, the scenery really opens up. You’ll walk through wide alpine meadows in Val di Funes with the Odle Geisler peaks towering above you.
This section leads you straight to Geisler Alm, which is easily the highlight of the hike. The views here are incredible, and it’s one of the best places in the Dolomites to stop for photos or a longer break.
After Geisler Alm, continue following the signs for the Adolf Munkel Weg. You’ll pass Gschnagenhardt Alm, another nice spot if you want to rest for a bit.
The final part of the hike takes you through a peaceful pine forest, with occasional clearings that frame the Odle Geisler peaks in a completely different way.
Follow the gently rolling trail no. 35, cross a small stream, and then pick up trail no. 6, which brings you back to your starting point.
9. Vajolet Towers/Torri del Vajolet

Starting point: Malga Frommer Alm
Ending point: Rifugio Re Alberto 1°
Distance: 7.3 km
Elevation gain: 600 meters
Duration: approx. 4 hours
Difficulty: Challenging
The Vajolet Towers are a group of dramatic rock spires rising out of the Rosengarten (Catinaccio), right on the border between South Tyrol and Trentino. It’s one of the most impressive mountain landscapes in the Dolomites.
There are several ways to reach the towers, including technical climbing routes, but this hike doesn’t require any climbing experience. That said, it’s still a tough one!
Start by parking at Malga Frommer Alm and taking the König Laurin chairlift up to Rifugio Fronza (Rosengarten Hütte). You can hike this section instead, but it adds a significant amount of time and elevation so I don’t think it’s worth it.
From the rifugio, follow trail no. 550. The hike starts off steep and rocky, with a few scrambling sections. There are cables in place to help, but good footwear is essential.
At the junction, ignore the left turn toward Via Ferrata Passo Santner unless you’re experienced and properly equipped. Instead, continue right toward Pas de le Coronelle.


The trail continues uphill and eventually leads to a set of wooden steps. Once you reach the top, you’ll be standing at around 2,630 meters, with wide views over the surrounding peaks.
From here, descend on trail no. 541 toward Rifugio Vajolet. This section is steep, and hiking poles are very helpful. Rifugio Vajolet is a great place to stop for food or a break, with the towers already towering above you.
If you still have energy, you can continue the final push up to Rifugio Re Alberto 1°. This last section involves a steep, rocky scramble and brings you right to the base of the Vajolet Towers. The views here are incredible and feel much more dramatic than from below.
While this hike is technically doable as a long out and back in one day, it’s very demanding. Out of all the hikes I’ve done in the Dolomites so far, this one felt like the hardest!
If you can, I highly recommend spending the night at Rifugio Re Alberto 1° and doing the descent the next day. Sunrise and sunset from the top are absolutely incredible and easily one of the most memorable experiences you can have in the Dolomites.
10. Cinque Torri
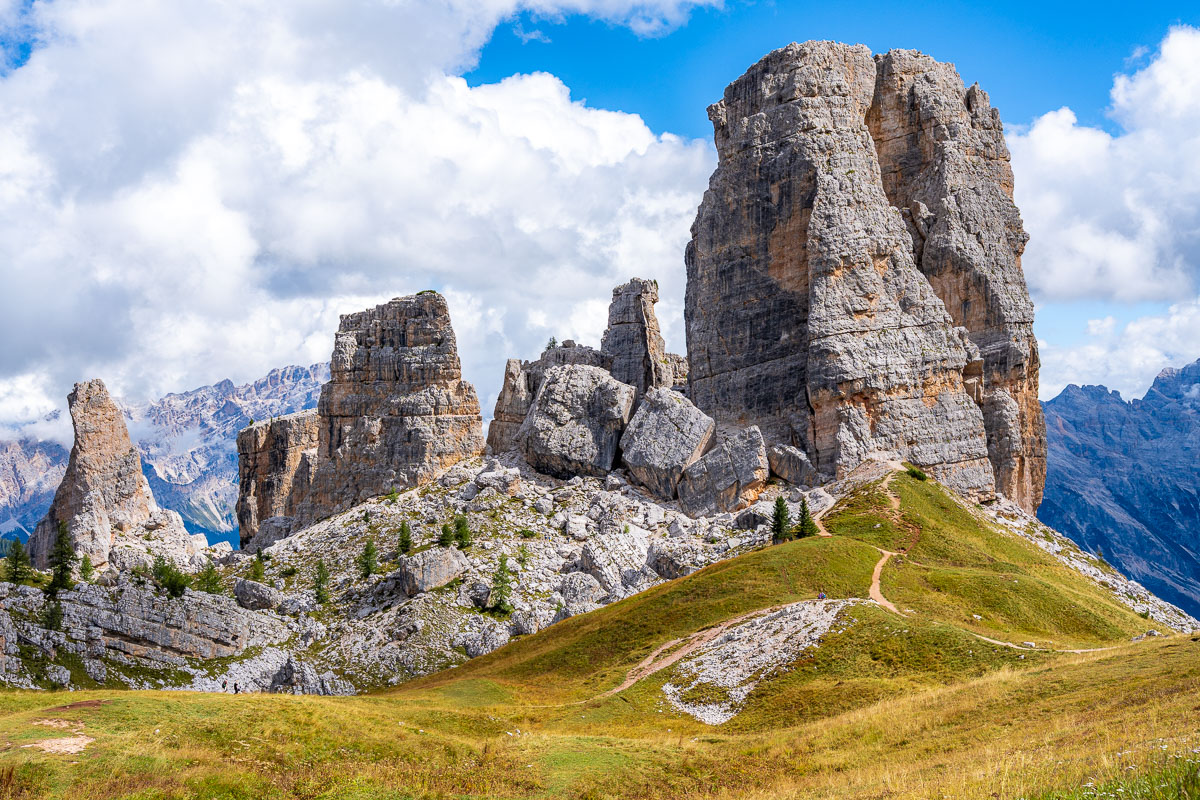
Starting point: Seggiovia Cinque Torri
Ending point: Seggiovia Cinque Torri
Distance: 3 km
Elevation gain: 136 meters
Duration: 1-1.5 hours
Difficulty: Easy
Cinque Torri is one of the most unique and accessible hiking areas in the Dolomites. The name translates to “Five Towers,” and once you arrive, it’s easy to see why!
Massive rock formations rise straight out of the alpine meadows, creating a landscape that feels completely different from the rest of the region.
The easiest way to visit Cinque Torri is by taking the cable car up from the Bai de Dones area near Passo Falzarego. From the top station, you can do a relaxed loop hike around the towers, with minimal elevation gain and constant views the entire way.
This makes it a great option if you want something scenic without a long or demanding hike.
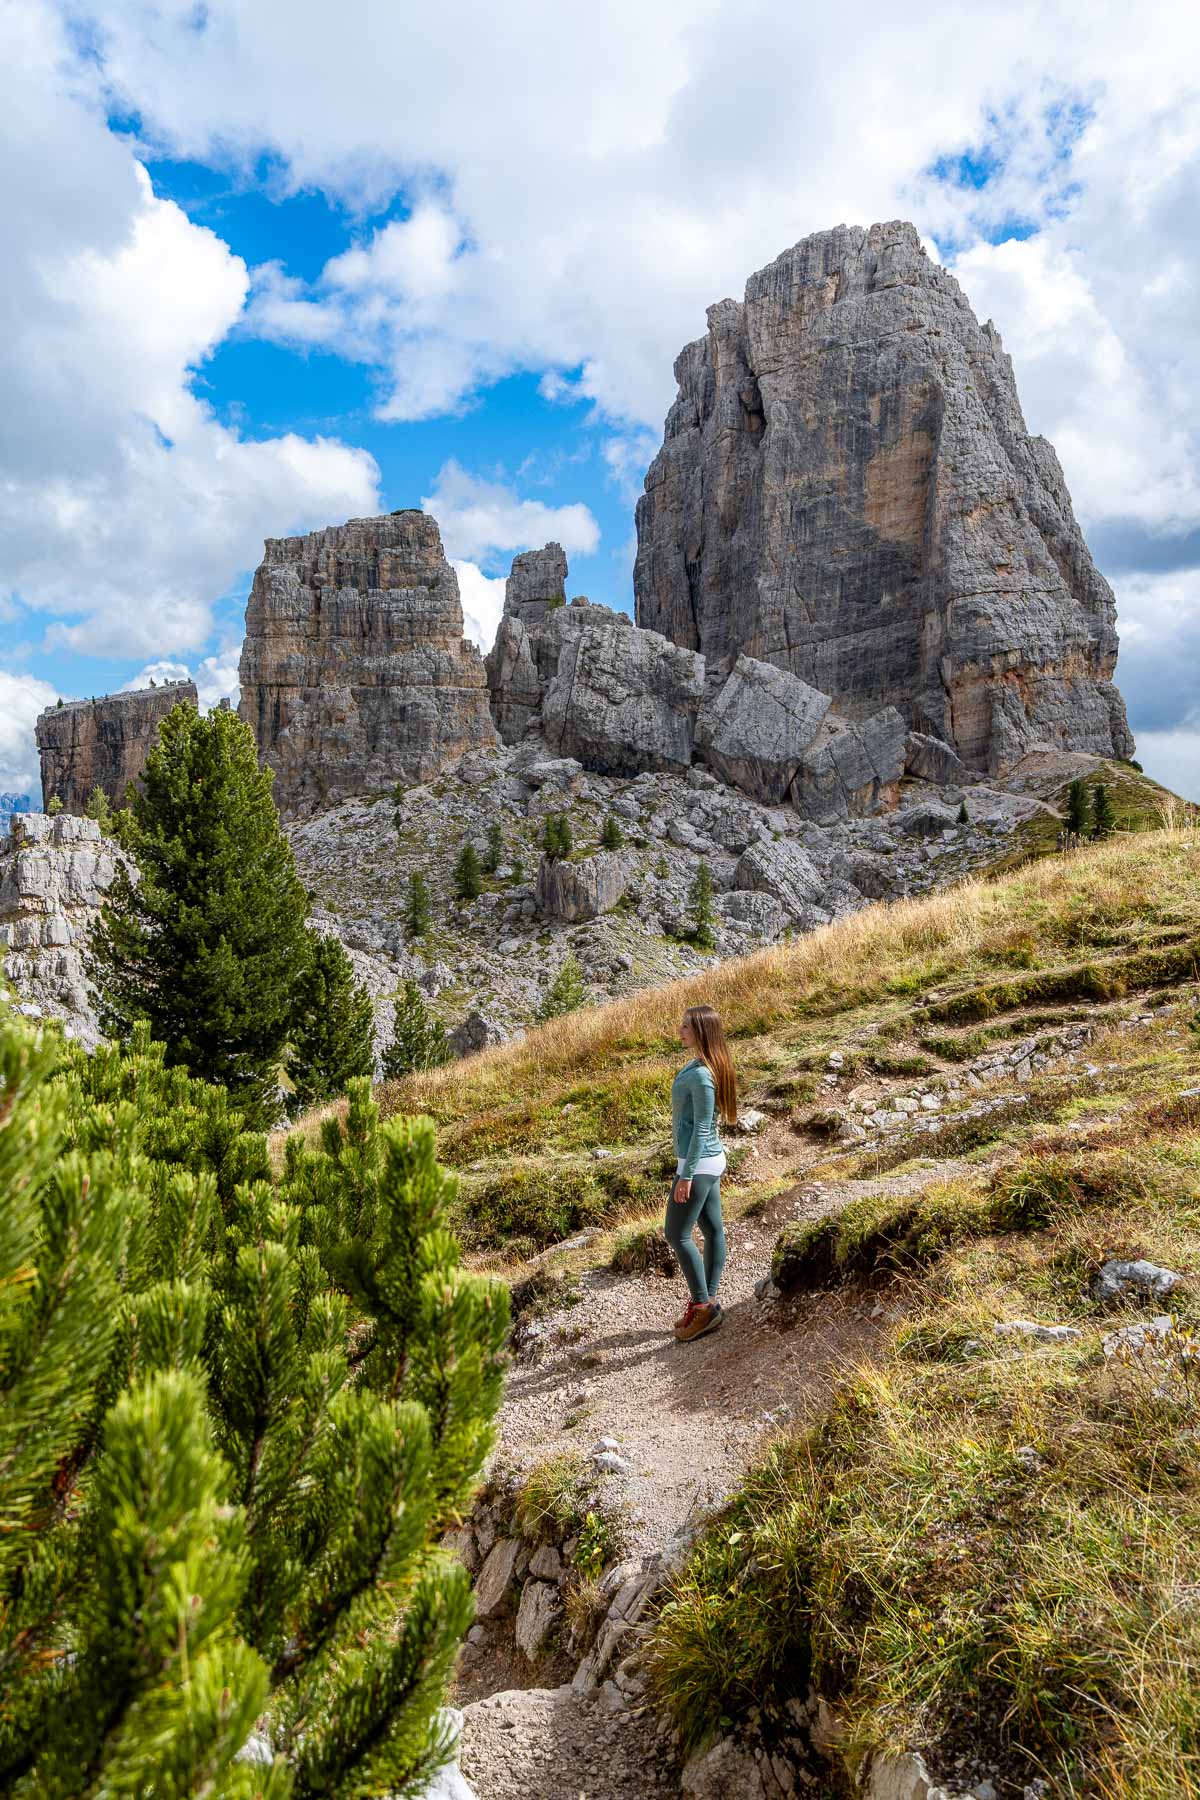
The main loop takes around 1 to 1.5 hours, depending on how often you stop for photos. The trail is well-marked and easy to follow, and you can get surprisingly close to the rock formations along the way.
Cinque Torri is also a popular climbing area, so you’ll likely see climbers on the towers as you walk around.
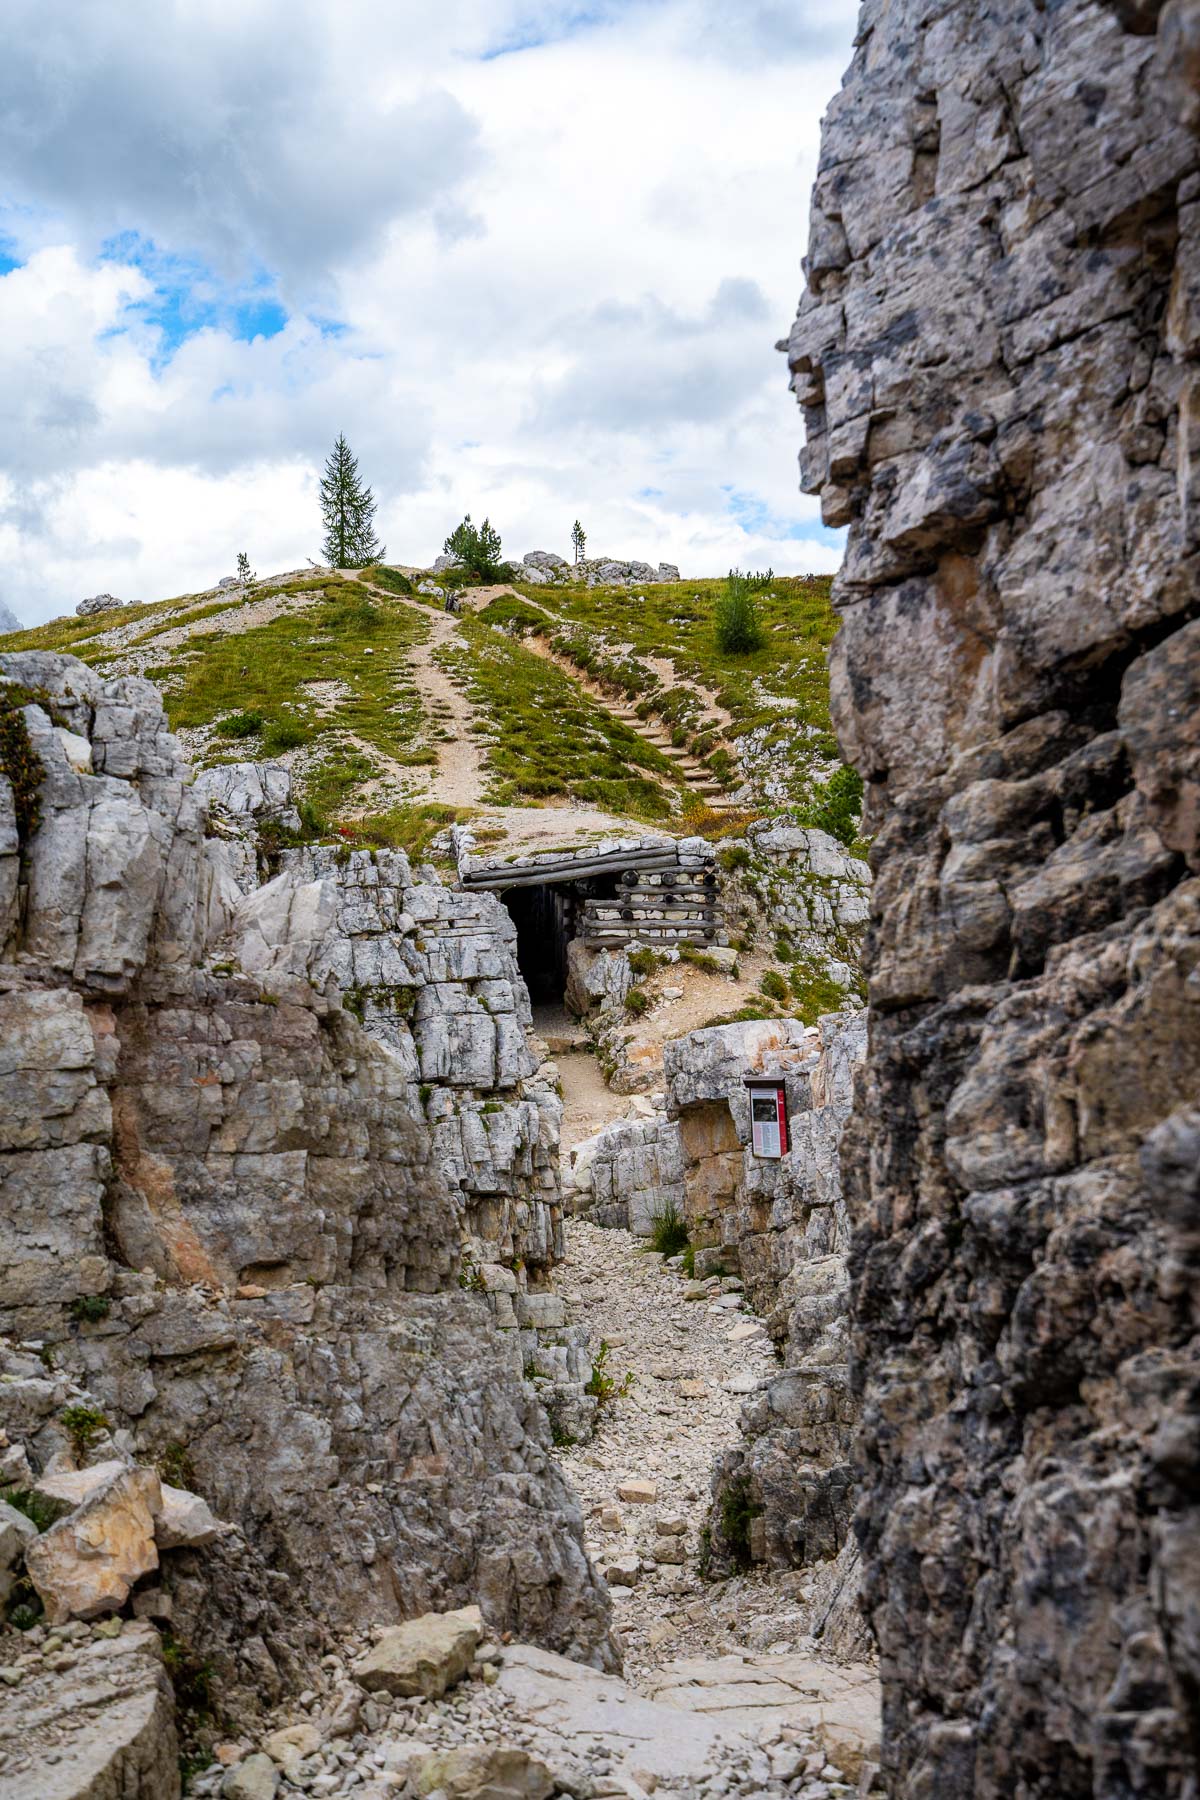
Along the route, you’ll also come across several open-air World War One sites, including trenches and tunnels that you can explore. They’re easy to reach from the trail and add an interesting historical layer to the hike without taking much extra time.
If you want to extend your visit, you can stop at Rifugio Scoiattoli or one of the nearby huts for food or a coffee with a view.
11. Lago di Braies Circuit

Starting point: Lago di Braies parking lot
Ending point: Lago di Braies parking lot
Distance: 4 km
Elevation gain: 50 meters
Duration: 1-2 hours
Difficulty: Easy
Lago di Braies is easily one of the most famous stops in the Dolomites, and there’s a good chance it’s already on your list.
The walk around the lake is completely flat and very easy, which makes it perfect if you want a relaxed hike or you’re visiting with kids. You simply follow the wide path around the turquoise water.
It takes about an hour to walk the full loop, but I’d allow closer to two hours if you want to stop for photos or have a picnic along the way.
Because Lago di Braies is so popular, it gets extremely busy during the day. Arriving early makes a huge difference. Sunrise is by far the best time to visit if you want fewer people and calmer water.


Parking is available just a short walk from the lake, but during peak season there are restrictions in place. Between July and September, you can’t drive up to the lake between 9:30 am and 4 pm unless you’ve reserved a parking spot in advance.
If you arrive before or after those hours, you can park without a reservation. If you’re not driving, bus 442 connects Lago di Braies with Dobbiaco.
If you have extra time after walking around the lake, renting a rowing boat is a nice way to see Lago di Braies from a different angle. Even without getting on the water, the views along the shoreline are beautiful and well worth taking your time with.
12. Lago di Carezza

Starting point: Lago di Carezza parking lot
Ending point: Lago di Carezza parking lot
Distance: 1.1 km
Elevation gain: 31 meters
Duration: 20-30 minutes
Difficulty: Easy
Lago di Carezza, also known as Karersee, is often called the “Rainbow Lake,” and once you see it in person, the name makes sense. Depending on the light, the water shifts between different shades of blue and green, which is what makes this stop so striking.
You can walk around the lake in about 20 to 30 minutes, making it a great option if you’re short on time or just want an easy walk with nice views.
The trail is well marked and mostly flat, with several viewpoints along the way where you can stop for photos.


Swimming isn’t allowed here, and the lake is fenced off to protect its fragile ecosystem. Even so, the views are excellent, especially with the Latemar mountain range rising behind the water.
Since this is a very popular stop, it’s best to visit early in the morning if you want to avoid crowds.
If you feel like turning this into a longer walk, you can also follow the Templeweg Trail, which leads away from the lake and into the Karerwald forest. This route is about 9.5 km long, well signposted, and takes around three hours to complete at a relaxed pace.


Thank you Kriszti for the wonderful information in this post : )
My pleasure 🙂